HQ RIP is used by several vendors as soft RIP, and is now used in many print and export centers in Japan. Since the HQ RIP is an English menu, it is troublesome for the user. During the use of RIP, linearization adjustment is often done. Here we introduce the HQ-510 RIP linearization adjustment.
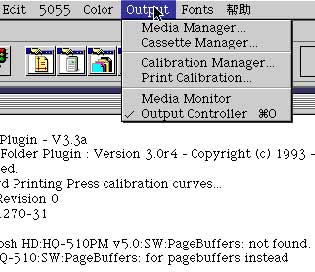
When the developer syrup concentration, the fixing temperature, and the photo-setter's light value are adjusted, set the page in RIP. Pay attention to the precision and dot shape to be adjusted. Different accuracy, dot shape, and negative film are used. The linearization data is different. Then click on the "Print Calibration" menu under the "Output" menu. As shown in Figure 1, the interface shown in Figure 2 appears.
In this interface, it should be noted that "Print uncalibrated target" means to output the unadjusted curve, and "Print calibrated target" means to output the adjusted curve. When doing linearity for the first time, first select the output precision (ie, the precision determined in the page setup) in the box under “From Page Setup(s)â€, then select the Print uncalibrated target. . Imagesetter will output the linearized test strip as shown below. Use a transmission densitometer to measure the actual percentage of dots in the box below each displayed value and record it. (The line "Uncalibrated Target for device '5055':uncalibrated" at the top of the test bar indicates that this test strip was output from the device driver name "5055". The linearized data has not been adjusted; the lower part of the text indicates the output. Accuracy, number of lines, dot angle, dot shape; “Max/Min†and the following black and white boxes are solid and blank parts. Before measuring the dot percentage, the two boxes can be used to measure the solid density and clear the density meter on the film. The middle of the film is the area that needs to measure the percentage of the dot, and the number of 0.0-100.0 is the percentage value of the dot that the dot should reach. The area under each dot is the density meter measurement area.)
Click the "Calibration Manager" menu under the "Output" menu (see Figure 1 for position). The screen shown in Figure 3 will appear on the screen.
There is no option available in dialog 1 when doing the linearization for the first time. You need to press “New†to create a new one. Before pressing, check whether the "Device" item is placed on the imagesetter you have built (how to create a new "Device" will be mentioned in a later article). The choice of "Color Space" is based on the RIP required during the distribution. The color separation is still determined by color separation in the distribution software (generally, color separation is not required in the RIP, and color separation can be performed in the distribution software. This item is also selected in the page setting, and the setting thereof is referred to). , The linearization data used by the two are different. Take color separation in the distribution software as an example. Select "Monochrome" for the "Color Space" item and click "New" to see the following screen: Figure 4.
Kitchen Utensil Holder,Cooking Utensil Holder,Kitchen Utensils Stand,Kitchen Utensil Rack
Xiongyang Household Co., Ltd , https://www.xyknives.com